Guide: Writing on the BFMS
This guide will help you learn to use the integrated fiction writing system on the BFMS, i.e. Bravo Fleet's main website. The instructions differ based on whether you have your own primary command or not. Typically, junior officers do not have their own command, while senior officers do. For more information on the non-mechanical aspects of fiction writing, check out the Lore Office's Introduction to Bravo Fleet Writing.
The basics of the fiction system are that a command is the ship or station where a mission is set (the 'command' for Star Trek: The Next Generation would be the Enterprise-D), missions are like episodes (the first mission for TNG would be "Encounter at Farpoint"), and stories are like scenes (the first story in "Encounter at Farpoint" would be the Enterprise encountering Q for the first time).
Writing without a Command (Cadets and Junior Officers)
Cadets and Junior Officers write on their unit's headquarters. For cadets, this is Starbase Bravo. For junior officers, this is the headquarters of their particular Task Force. This headquarters is represented in the system by both a command and a unit-level mission. You will only have access to the mission for the task force you are a part of. Members are asked to create sub-missions within the unit-wide mission to create what is essentially a thread for their own writing. Here is how to get started:
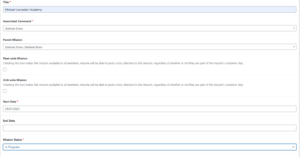
- Create a Mission:
- Navigate either to the headquarters mission of your task force linked above or to the Writing Controls panel of your dashboard. From the headquarters mission itself, click 'Add Sub-Mission.' From the Writing Controls panel, click 'Create Mission.'
- Give your mission a title.
- Select the headquarters command as the Associated Command.
- Select the headquarters mission as the Parent Mission.
- Do not check 'Fleet-wide mission' or 'Unit-Wide Mission.'
- Select the start date as today's date.
- Select 'In Progress' as the mission status.
- Upload a mission image if you choose to do so.
- In the mission summary, provide a short summary of what you will be writing/what kind of writing will go in this mission. Think of this as the TV Guide summary, so you don't need to know the ending or give it away here. Something like "The adventures of Lieutenant Commander Bob."
- In the mission description, you can provide either the same information as the previous step or provide a more detailed mission summary. You can always come back to expand on this later.
- Scroll up and hit 'Publish.'
- Now that you've created your mission, go back to your Dashboard and click 'Create Story'
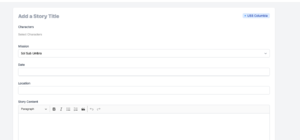
- Create a Story:
- Give your story a title.
- Select the mission you just created.
- Give your story a date. This does not have to be precise. 'Mid-2399,' or 'April 5, 2399' are both options. You could also use a stardate, if you wished.
- Select the characters in your story. As a junior officer or cadet, you can select any character on your account.
- Add the story content (i.e. the story itself) to the Story Content box.
- Hit publish.
- Fiction ribbons will be assigned automatically after your story is published.
Writing with a Command (Senior Officers)
The steps for those members with their own commands differ slightly from the above instructions.
- Create a Mission:
- Navigate either to your command or to the Writing Controls panel of your dashboard. From your command click 'Add Mission.' From the Writing Controls panel, click 'Create Mission.'
- Give your mission a title.
- Select your command
- If this is part of a fleet-wide or unit-wide plot, select the appropriate parent mission. Otherwise, you can ignore this field.
- Do not check 'Fleet-wide mission' or 'Unit-Wide Mission.'
- Select the start date as today's date.
- Select 'In Progress' as the mission status.
- Upload a mission image if you choose to do so.
- In the mission summary, provide a short summary of what you will be writing/what kind of writing will go in this mission. Think of this as the TV Guide summary, so you don't need to know the ending or give it away here. Something like "The Arcturus encounters a powerful anomaly in the Delta Quadrant."
- In the mission description, you can provide either the same information as the previous step or provide a more detailed mission summary. You can always come back to expand on this later.
- Scroll up and hit 'Publish.'
- Now that you've created your mission, go back to your Dashboard and click 'Create Story'
- Create a Story:
- Give your story a title.
- Select the mission you just created.
- Give your story a date. This does not have to be precise. 'Mid-2399,' or 'April 5, 2399' are both options. You could also use a stardate, if you wished.
- Select the characters in your story. The characters you use must be set to story mode and assigned to your command.
- Add the story content (i.e. the story itself) to the Story Content box.
- Hit publish.
- Fiction ribbons will be assigned automatically after your story is published.


